Editing the Tag Tree
The “Tags” window shows the set of tags that Tagboat has encountered in scanning your managed file areas. You can use it to add and organize tags, and to delete unused tags.
The Initial Tag Set
When you first launch Tagboat, it starts with macOS’ standard color-coded tags as the starting tag set shown in the “Tags” window. When you add managed folders for Tagboat to track, it adds any tags it encounters in those file subtrees to the known tag set.
Adding Tags
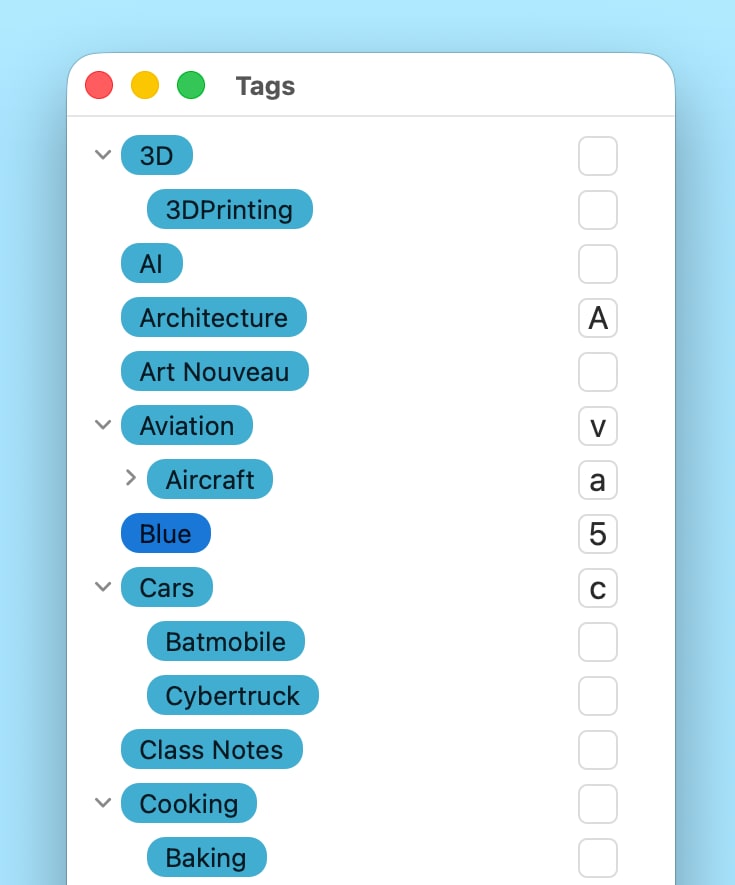
To add a tag, click the “[+]” button in the “Tags” window’s lower-left corner. Tagboat will prompt you to enter a name for the tag. Press [return] when you’re done typing. Tagboat will then move the tag into the appropriate position to keep your tag tree sorted.
If you want, you can assign a hotkey to the tag, and/or drag it under a suitable parent tag, as described below.
Deleting Tags
If there’s a tag that you created accidentally and aren’t using, you can delete it by clicking to select it and then clicking the “[-]“ button in the “Tags” window’s lower-left corner. Only tags that aren’t applied to any file, and that don’t have any child tags, can currently be deleted. If one or more files has the tag applied, it must remain in your tag tree, since the tag tree shows all tags that are in use. If a tag has child tags, the child tags must be deleted or moved before the parent tag can be deleted.
Assigning Hotkeys
You can assign a hotkey to a tag by clicking in the box to the right of the tag’s title and typing a letter or digit. This makes that character a convenient shortcut for applying the tag to a file: When you hold the [control] key and type the character with one or more files selected, or with the focus in a file’s tag list, it instantly toggles application of the tag. For example, if you assign the hotkey “p” to a tag named “Photography”, pressing [control]+[p] will toggle application of the “Photography” tag on the selected file(s): adding it if it’s absent, or removing it if it’s already applied.
Tagboat treats upper- and lower-case letters as distinct, so all 26 uppercase letters, as well as the 26 lowercase letters and 10 digits, are available to assign as tag hotkeys. By choosing and assigning memorable hotkeys to your most frequently used tags, you can make quick work of tagging your files.
Organizing Your Tags in a Tree
By default, the “Tags” window shows a simple, alphabetical list, but you can arrange your tags in a tree if you want. You would typically do this when some of your tags are sub-types or special cases of other tags: where applying a tag typically means you should also apply the tag’s parent. For example, you might classify tags identifying various aircraft as children of an “Aircraft” tag, which might in turn be a child tag of “Aviation”. You can drag and drop any tag to move it under a desired parent tag. This sets up a relationship that indicates the parent tag should be applied anywhere the child tag is applied.
Tagboat’s ability to organize your tags into a tree extends macOS’ built-in tagging capability into a higher dimension. When you apply a tag to a file, Tagboat will automatically apply its chain of parent tags if you enable “Apply parent tags” in the file area’s settings. This makes applying inherited tags fast and automatic, and ensures that they’re consistently applied, making tagged files reliably show up in relevant tag-based searches in Finder.
Tagboat’s free edition supports organizing up to 5 tags under parent tags to try the feature out. Purchasing Tagboat Pro unlocks unlimited tag-tree-building potential!